 | Chapter 15 Layout Managers |  |

| Chapter 15 Layout Managers | |
GridBagLayout is a very flexible layout manager
that allows you to position components relative to one another using
constraints. With GridBagLayout (and a fair amount
of effort), you can create almost any imaginable layout.
Components are arranged at logical coordinates on a abstract grid.
We'll call them "logical" coordinates because they really designate positions
in the space of rows and columns formed by the set of components.
Rows and columns of the grid stretch to different sizes, based on the
sizes and constraints of the components they hold.
A row or column in a GridBagLayout expands
to accommodate the dimensions and
constraints of the largest component in its ranks.
Individual components may span more than one row or column.
Components that aren't as large as their
grid cell can be anchored within their cell. They can also be
set to fill or expand their area in either dimension. Extra area in
the grid rows and columns can be parceled out according to the weight
constraints of the components. Therefore, you can control how various
components will grow and stretch when a window is resized.
GridBagLayout is much easier to use in a
graphical, WYSIWYG GUI builder
environment. That's because working with GridBag is kind of like messing
with the "rabbit ears" antennae on your television. It's not
particularly difficult
to get the results that you want through trial and error, but writing out
hard and fast rules for how to go about it is difficult.
In short,
GridBagLayout is complex and has some
quirks. It is also simply a bit ugly both
in model and implementation. Remember that you can do a lot with nested
panels and by composing simpler layout managers within one another.
If you look back through this chapter, you'll see many examples of composite
layouts; it's up to you to determine how far you should go before making
the break from simpler layout managers to a more complex "do it all in one"
layout manager like GridBagLayout.
Having said that GridBagLayout is complex
and a bit ugly, I'm going to contradict myself and say that it's
surprisingly simple. There is only one constructor with no arguments
(GridBagLayout()), and there aren't a lot
of fancy methods to control how the display works.
The appearance of a grid bag layout is controlled by sets of
GridBagConstraints, and that's where
things get hairy. Each component managed by a
GridBagLayout is associated with a
GridBagConstraints
object. GridBagConstraints holds the
following variables, which we'll describe in detail shortly:
int gridx, gridyControls the position of the component on the layout's grid.
int weightx, weightyControls how additional space in the row or column is allotted to the component.
int fillControls whether the component expands to fill the space allocated to it.
int gridheight, gridwidthControls the number of rows or columns the component occupies.
int anchorControls the position of the component if there is extra room within the space allocated for it.
int ipadx, ipadyControls padding between the component and the borders of its area.
Insets insetsControls padding between the component and neighboring components.
To make a set of constraints for a component or components, you
simply create a new instance of GridBagConstraints and set these public
variables to the appropriate values. There are no pretty constructors,
and there's not much else to the class at all.
The easiest way to associate a set of constraints with a component is
to use the version of add() that takes
a layout object as an argument, in addition to the component itself. This
puts the component in the container and associates your
GridBagConstraints object with it:
	Component component = new Label("constrain me, please...");
	GridBagConstraints constraints = new GridBagConstraints;
	constraints.gridx = x;
	constraints.gridy = y;
	...
	add( component, constraints );
You can also add a component to a
GridBagLayout by using the single argument
add() method, and then later calling the
layout's setConstraints() method directly, to
pass it the GridBagConstraints object for
that component:
	add( component );
	...
	myGridBagLayout.setConstraints( component, constraints );
In either case, the set of constraints is copied when it is applied to
the component. Therefore, you're free to create a single set of
GridBagConstraints, modify it as needed,
and apply it as needed to different objects. You might find it helpful
to create a helper method that sets the constraints appropriately,
then adds the method with its constraints to the layout. That's the
approach we'll take in our examples; our helper method is called
addGB(), and it takes a component plus a
pair of coordinates as arguments. These coordinates become the
gridx and
gridy values for the constraints.
We could expand upon this later and overload
addGB() to take
more parameters for other constraints that we often change from component
to component.
One of the biggest surprises in the
GridBagLayout is that there's no way to
specify the size of the grid. There doesn't have to be. The grid size
is determined implicitly by the constraints of all the objects; the
layout manager picks dimensions large enough so that everything fits.
Thus, if you put one component in a layout and set its
gridx and
gridy constraints to 25, the layout
manager creates a 25 x 25 grid, with rows and columns both numbered
from 0 to 24. If you add a second component with a
gridx of 30 and a
gridy of 13, the grid's dimensions change
to 30 x 25. You don't have to worry about setting up an appropriate
number of rows and columns. The layout manager does it automatically,
as you add components.
With this knowledge, we're ready to create some simple displays. We'll
start by arranging a group of components in a cross shape. We maintain
explicit x and
y local variables, setting them as we add
the components to
our grid. This is partly for clarity, but it can
be a handy technique when you want to add a number of components in a
row or column. You can simply increment gridx
or gridy before adding each component. This is
a simple and problem-free way to achieve relative placement.
(Later, we'll describe GridBagConstraints's
RELATIVE constant, which does relative placement automatically.)
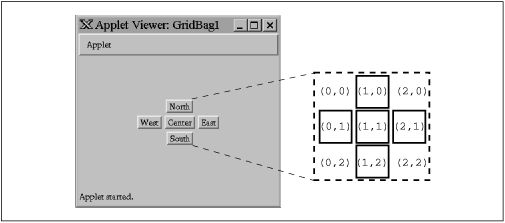
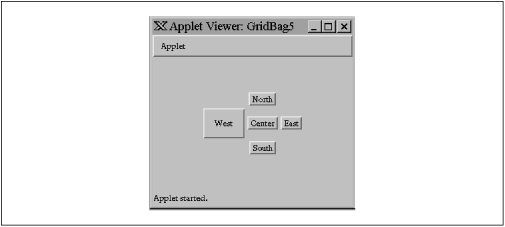
Here's our first layout (see Figure 15.6).
import java.awt.*;
public class GridBag1 extends java.applet.Applet {
    GridBagConstraints constraints = new GridBagConstraints();
    void addGB( Component component, int x, int y  ) {
        constraints.gridx = x;
		constraints.gridy = y;
        add ( component, constraints );
    }

    public void init() {
        setLayout( new GridBagLayout() );
        int x, y;  // for clarity
        addGB( new Button("North"),  x=1,y=0 );
        addGB( new Button("West"),   x=0,y=1 );
        addGB( new Button("Center"), x=1,y=1 );
        addGB( new Button("East"),   x=2,y=1 );
        addGB( new Button("South"),  x=1,y=2 );
    }
}
You probably noticed that the buttons in this example are "clumped" together in the center of their display area. Each button is displayed at its preferred size, without stretching the button to fill the available space. This is how the layout manager behaves when the "weight" constraints are left unset. We'll talk more about weights in the next two sections.
Let's make the buttons expand to fill the entire applet. To do so,
we must take two steps: we must set the
fill constraint for each button to the
value BOTH, and we must set the
weightx and
weighty values to a nonzero value, as shown in the applet below.
Figure 15.7 shows the resulting layout.
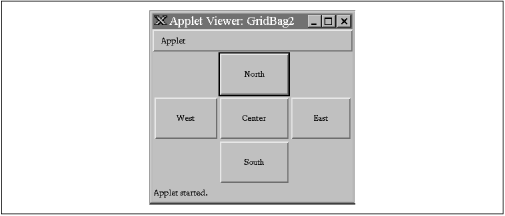
    public void init() {
        setLayout( new GridBagLayout() );
        constraints.weightx = 1.0;
        constraints.weighty = 1.0;
        constraints.fill = GridBagConstraints.BOTH;
        int x, y;  // for clarity
        addGB( new Button("North"),  x=1,y=0 );
        addGB( new Button("West"),   x=0,y=1 );
        addGB( new Button("Center"), x=1,y=1 );
        addGB( new Button("East"),   x=2,y=1 );
        addGB( new Button("South"),  x=1,y=2 );
    }
BOTH is one of the constants of the
GridBagConstraints class; it tells the
component to fill the available space in both directions. Here is a list of the constants that you can use to set the fill
field:
HORIZONTALFill the available horizontal space.
VERTICALFill the available vertical space.
BOTHFill the available space in both directions.
NONEDon't fill the available space; display the component at its preferred size.
We set the weight constraints to 1.0; in this example it doesn't matter what
they are, provided that each component has the same nonzero weight.
fill doesn't happen if the
component weights in the direction you're filling are 0, which is the
default value.
One of the most important features of
GridBaglayout is
that it lets you create arrangements in which components span two or
more rows or columns. To do so, you set the
gridwidth and gridheight
variables of the GridBagConstraints. Here's an
applet that creates such a display; button one spans two columns
vertically, and button four spans two horizontally (see Figure 15.8):
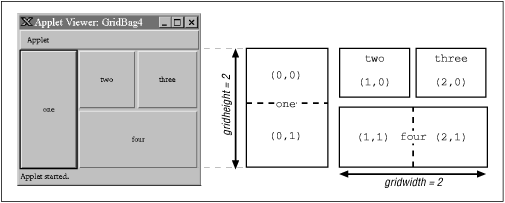
    public void init() {
        setLayout( new GridBagLayout() );
        constraints.weightx = 1.0;
        constraints.weighty = 1.0;
        constraints.fill = GridBagConstraints.BOTH;
        int x, y;  // for clarity
        constraints.gridheight = 2; // Span two rows
        addGB( new Button("one"),   x=0, y=0 );
        constraints.gridheight = 1; // set it back
        addGB( new Button("two"),   x=1, y=0 );
        addGB( new Button("three"), x=2, y=0 );
        constraints.gridwidth = 2; // Span two columns
        addGB( new Button("four"),  x=1, y=1 );
        constraints.gridwidth = 1; // set it back
    }
The size of each element is controlled by the
gridwidth and gridheight values
of its constraints. For button one, we set
gridheight to 2. Therefore, it is two cells high;
its gridx and gridy positions
are both zero, so it occupies cell (0,0) and the cell directly below
it, (0,1). Likewise, button four has a gridwidth of
2 and a gridheight of 1, so it occupies two cells
horizontally. We place this button in cell (1,1), so it occupies that
cell and its neighbor, (2,1).
In this example, we set the fill to
BOTH and
weightx and
weighty to 1 for all components. By doing
so, we told each button to occupy all the space available. Strictly
speaking, this isn't necessary. However, it makes it easier to see
exactly how much space each button occupies.
The weightx and
weighty variables of a
GridBagConstraints object determine how
"extra" space in the container is distributed among the columns or rows in
the layout. As long as
you keep things simple, the effect these variables have is fairly
intuitive: the larger the weight, the greater the amount of space
allocated to the component. Figure 15.9 shows what happens if we
vary the weightx constraint from 0.1 to
1.0 as we place three buttons in a row.
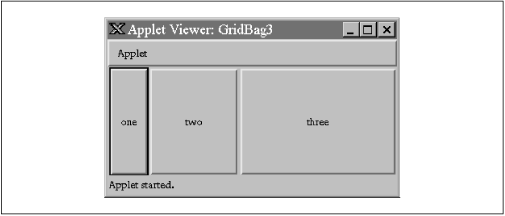
    public void init() {
        setLayout( new GridBagLayout() );
        constraints.fill = GridBagConstraints.BOTH;
        constraints.weighty = 1.0;
        int x, y; // for clarity
        constraints.weightx = 0.1;
        addGB( new Button("one"),   x=0, y=0 );
        constraints.weightx = 0.5;
        addGB( new Button("two"),   ++x, y );
        constraints.weightx = 1.0;
        addGB( new Button("three"), ++x, y );
    }
The specific values of the weights are not meaningful; it is only their proportions relative to one another that matter. After the preferred sizes of the components (including padding and insets--see below) are determined, any extra space is dolled out in proportion to the component's weights. So, for example, if each of our three components had the same weight each would receive a third of the extra space. To make this more obvious, you may prefer to have your weights in a row or column add to 1 when possible. Components with a weight of 0 receive no extra space.
The situation is a bit more complicated when there are multiple rows or
columns and when there is even the possibility of components spanning more than
one cell. In the general case, GridBagLayout calculates an effective overall
weight for each for each row and each column and then distributes the extra
space to them proportionally. Note that our single row example
above is just a special case where the columns each have one component.
The gory details of the calculations follow.
For a given row or column, GridBagLayout first
considers the weights of all of the components contained strictly within that
rank--ignoring those that span more than one cell. The greatest individual
weight becomes the overall weight of the row or column. Intuitively this
means that GridBagLayout is trying to accomodate the needs of the weightiest
component in that rank.
Next, GridBagLayout considers the components that occupy more
than one cell. Here things get a little weird. GridbagLayout wants to evaluate
them like the others, to see if they affect the determination of the largest
weight in a row or column. However, because these components occupy more than one cell, GridBagLayout divides their weight among the ranks (rows or columns) that they span. GridBagLayout tries to calculate an effective weight for the portion of the component
that occupies each of its rows or columns.
It does this by trying to divide the weight of the
component among the ranks in the same proportions that the length (or height) of the
component will be shared by the ranks.
But how does it know what the proportions will be before the whole grid is
determined? That's what it's trying to calculate after all.
It simply guesses based on the row or column weights already determined. GridbagLayout uses the weights determined by the first round of
calculations to split up the weight of the component over the ranks that it
occupies. For each row or column, it then considers that fraction of the weight
to be the component's weight for that rank. That weight then contends for
the "heaviest weight" in the row or column, possibly changing the overall weight
of that row or column, as we described earlier.
If a component is smaller than the space available for it, it is
centered by default. But centering isn't the only possibility. The
anchor constraint tells a grid bag layout
how to position a component within its space. Possible values are:
GridBagConstraints.CENTER,
NORTH, NORTHEAST, EAST, SOUTHEAST, SOUTH, SOUTHWEST, WEST, and
NORTHWEST. For example, an anchor of
GridBagConstraints.NORTH centers a
component at the top of its display area;
SOUTHEAST places a component at the bottom
left of its area.
Another way to control the behavior of a component in a grid bag
layout is to use padding and insets. Padding is determined by the
ipadx and
ipady fields of
GridBagConstraints. They specify
additional horizontal and vertical space that is added to the
component when it is placed in its cell. In Figure 15.10, the
West button is larger because we have set the
ipadx and
ipady values of its constraints to 25.
Therefore, the layout manager gets the button's preferred size and adds
25 pixels in each direction to determine the button's actual size. The
sizes of the other buttons are unchanged because their padding is set
to 0 (the default), but their spacing is different. The West button is
unnaturally tall, which means that the middle row of the layout must
be taller than the others.
    public void init() {
        setLayout( new GridBagLayout() );
        int x, y;  // for clarity
        addGB( new Button("North"),  x=1,y=0 );
        constraints.ipadx = 25;  // set padding
        constraints.ipady = 25;
        addGB( new Button("West"),   x=0,y=1 );
        constraints.ipadx = 0;   // set padding back
        constraints.ipady = 0;
        addGB( new Button("Center"), x=1,y=1 );
        addGB( new Button("East"),   x=2,y=1 );
        addGB( new Button("South"),  x=1,y=2 );
    }
Notice that the horizontal padding, ipadx,
is added on both the left and right sides of the button. Therefore,
the button grows horizontally by twice the value of
ipadx. Likewise, the vertical padding,
ipady, is added on both the top and the
bottom.
Insets add space between the edges of the component and its cell. They
are stored in the insets field of
GridBagConstraints, which is an
Insets object. An
Insets object has four fields, to specify
the margins on the top,
bottom, left,
and right of the component. The
relationship between insets and padding can be confusing. As shown in
Figure 15.11, padding is added to the component itself,
increasing its size. Insets are external to the component and
represent the margin between the component and its cell.
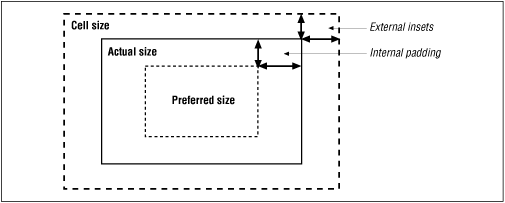
Padding and weighting have an odd interaction with each other. If you
use padding, it is best to use the default
weightx and
weighty values for each component.
In all of our grid bag layouts so far, we have specified the
gridx and gridy
coordinates of each component explicitly using its constraints.
Another alternative is relative positioning.
Conceptually, relative positioning is simple: we simply say "put this
component to the left of (or below) the previous component." To do so,
set gridx or
gridy to the constant
GridBagConstraints.RELATIVE.
Unfortunately, it's not as simple as this. Here are a couple of
warnings:
To place a component to the right of the previous one, set
gridx to
RELATIVE and use the same
value for gridy as you used for the
previous component.
Similarly, to place a component below the previous one, set
gridy to
RELATIVE and leave
gridx unchanged.
Setting both gridx and
gridy to
RELATIVE places all the components in one
row, not in a diagonal line, as you would expect. (This is the
default.)
In other words, if gridx or
gridy is RELATIVE, you had
better leave the other value unchanged. RELATIVE makes it easy to arrange a lot of
components in a row or a column. That's what it was intended for; if
you try to do something else, you're fighting against the layout
manager, not working with it.
GridBagLayout allows another kind of
relative positioning, in which you specify where, in a row or a
column, the component should be placed. To do so, you use
the gridwidth and
gridheight fields of
GridBagConstraints. Setting either of
these to the constant REMAINDER says that
the component should be the last item in its row or column, and
therefore should occupy all the remaining space. Setting either
gridwidth or
gridheight to
RELATIVE says that it should be the second
to the last item in its row or column. Obviously, you can use these
constants to create constraints that can't possibly be met; for
example, you can say that two components must be the last
component in a row. In these cases, the layout manager tries to
do something reasonable--but it will almost certainly do something you
don't want. Again, relative placement works well as long as you don't
try to twist it into doing something it wasn't designed for.
Sometimes things don't fall neatly into little boxes. This is true of
layouts as well as life. For example, if you want to use some of
GridBagLayout's weighting features for
part of your GUI, you could create separate layouts for different
parts of the GUI and combine them with yet another layout. That's how
we'll build the pocket calculator interface in Figure 15.12. We will use three
grid bag layouts: one for the first row of buttons (C, %, +), one for
the last (0, ., =), and one for the applet itself. The master layout
(the applet's) manages the text field we use for the display, the
panels containing the first and last rows of buttons, and the twelve
buttons in the middle.[2]
[2] If you're curious, this calculator is based on the ELORG-801, which I found in an online "calculator museum"; see http://www.geocities.com/CapeCanaveral/6747/elorg801.jpg.
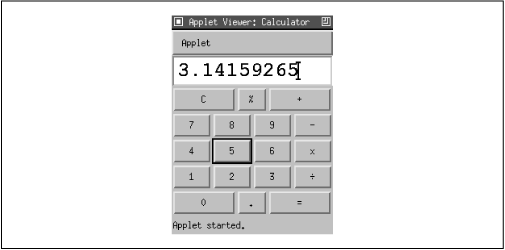
Here's the code for the Calculator applet.
It implements only the user interface (i.e., the keyboard); it
collects everything you type in the display field, until you press C
(clear). Figuring
out how to connect the GUI to some other code that would perform the
operations is up to you. One strategy would be to send an event to the
object that does the computation whenever the user presses the equals
sign. That object could read the contents of the text field, parse it,
do the computation, and display the results.
import java.awt.*;
import java.awt.event.*;
public class Calculator extends java.applet.Applet
                            implements ContainerListener, ActionListener {
    GridBagConstraints gbc = new GridBagConstraints(); {
        gbc.weightx = 1.0;  gbc.weighty = 1.0;
        gbc.fill = GridBagConstraints.BOTH;
    }
    TextField theDisplay = new TextField();
    public void init() {
        setFont( new Font("Monospaced", Font.BOLD, 24) );
        addContainerListener( this );
        gbc.gridwidth=4;
        addGB( this, theDisplay, 0, 0 );
        // make the top row
        Panel topRow = new Panel();
        topRow.addContainerListener( this );
        gbc.gridwidth = 1;
        gbc.weightx = 1.0;
        addGB( topRow, new Button("C"), 0, 0 );
        gbc.weightx = 0.33;
        addGB( topRow, new Button("%"), 1, 0 );
        gbc.weightx = 1.0;
        addGB( topRow, new Button("+"), 2, 0 );
        gbc.gridwidth = 4;
        addGB( this, topRow, 0, 1 );
        gbc.weightx = 1.0;  gbc.gridwidth = 1;
        // make the digits
        for(int j=0; j<3; j++)
            for(int i=0; i<3; i++)
                addGB( this, new Button( "" + ((2-j)*3+i+1) ), i, j+2 );
        // -, x, and divide
        addGB( this, new Button("-"), 3, 2 );
        addGB( this, new Button("x"), 3, 3 );
        addGB( this, new Button("\u00F7"), 3, 4 );
        // make the bottom row
        Panel bottomRow = new Panel();
        bottomRow.addContainerListener( this );
        gbc.weightx = 1.0;
        addGB( bottomRow, new Button("0"), 0, 0 );
        gbc.weightx = 0.33;
        addGB( bottomRow, new Button("."), 1, 0 );
        gbc.weightx = 1.0;
        addGB( bottomRow, new Button("="), 2, 0